


The colder weather means more time spent inside. That’s fine by me, especially when you have yummy treats to munch on 🙂 Using a variety of Hostess snacks, I was asked to come up with a fun edible creation. Since I’m not very crafty it was a challenge to think of something. But, the end result was so cute, it might be something we do more often!
So, I started with this:
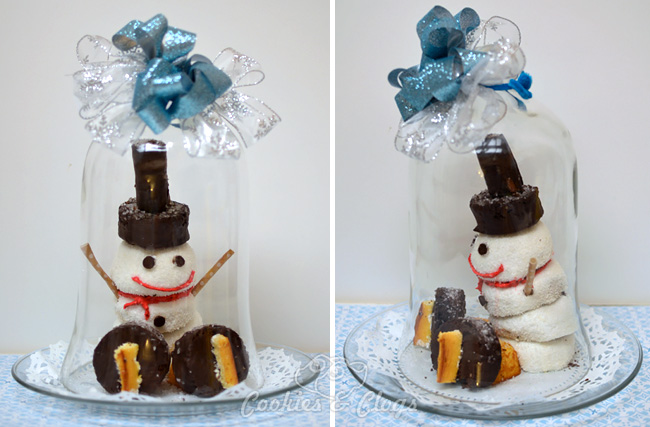
With the help of my family and a quick shopping trip to Target, we ended up with this (you might want to pin this, just saying):
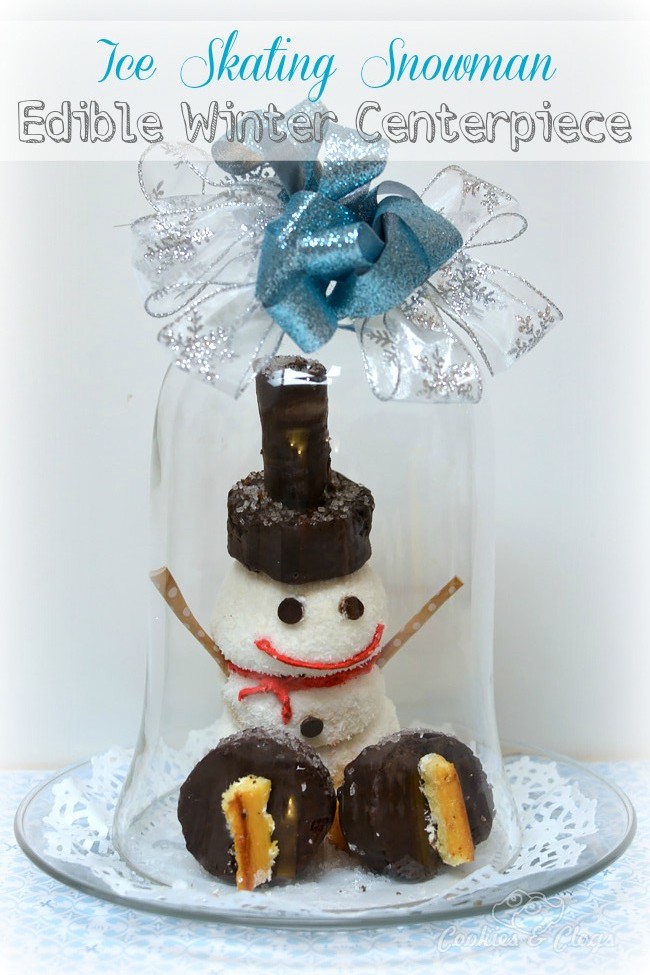
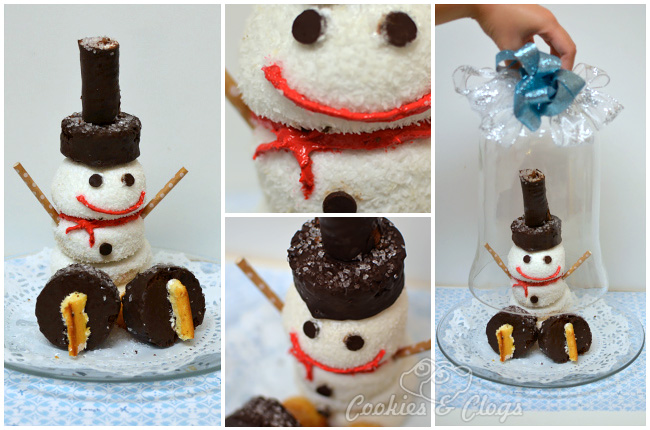
Every edible bit in this Ice Skating Snowman Winter Centerpiece is from Hostess snacks, aside from the chocolate chips and sugar sprinkled on top. The mouth and scarf are actually made from the creamy center of a Twinkie and some food dye.
Ice Skating Snowman Edible Winter Centerpiece Tutorial
Supplies
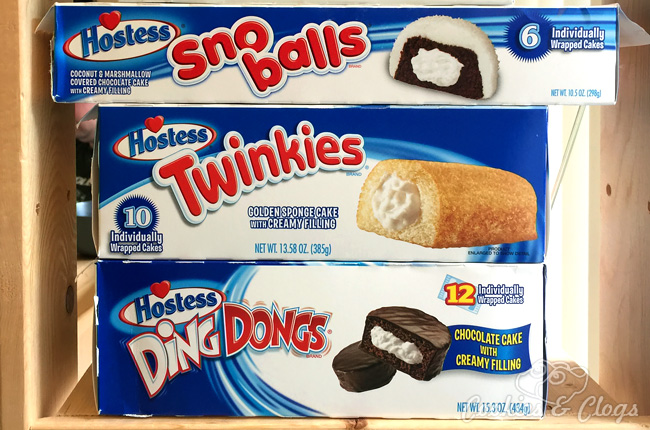
- 4 Hostess Sno balls
- 3 Hostess Ding Dongs
- 2 Hostess Twinkies
- 1 Ho Ho
- 4 Chocolate chips
- 2 Popsicle sticks
- 2-3 Straws, chopsticks, or dowels
- 1 Decorative straw
- Sparkly sprinkles (sugar)
Instructions
- Using 2-3 straws, chopsticks, or dowels to hold them steady, place four Sno balls on top of each other with the bottom side down. Originally, I placed the bottom Sno Ball upside down to create a spherical shape but it was not strong enough that direction and kept breaking apart. If the straws, chopsticks, or dowels you use end up being too long, you can always switch them out later.
- Cut Twinkie in half (width-wise) and place one piece next to the snowman structure for its leg, rounded side touching the Sno Ball. Poke popsicle stick through cream of Twinkie and partially into the snowman. Do not push the entire stick in. Leave about 1/2″ poking out to use later. Repeat with other half.
- Place a Ding Dong on the exposed popsicle stick for a foot. Repeat with second Ding Dong for the other foot.
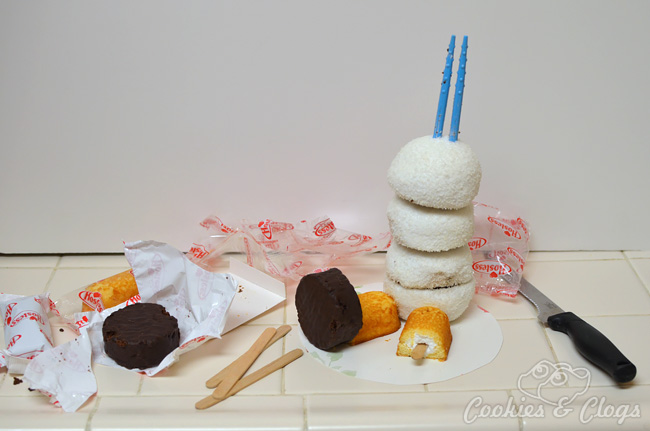
- On top of the snowman, slide one Ding Dong over the straws, chopsticks, or dowels.
- Carefully cut the chocolate ends off a Ho Ho. Slide vertically over the straws, chopsticks, or dowels on top of Ding Dong to complete hat.
- Cut a decorative straw in half. Place one piece on each side of the snowman for arms. You could use two pretzel sticks instead but I found some cute brown polka dot paper straws and thought they were perfect for this.
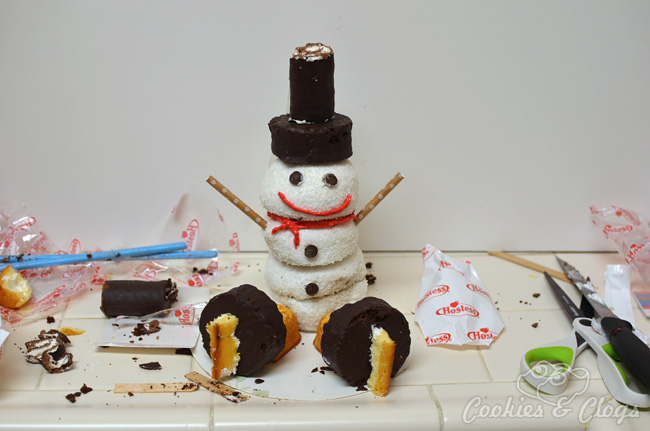
- Poke holes into Sno Balls for eyes and buttons. Use a dot of Twinkie cream filling as glue and press (flat side out) firmly onto snowman.
- Cut rounded ends off second Twinkie. Cut two rectangular pieces for the skates and attach to Ding Dongs with a little bit of Twinkie cream.
- Collect remaining Twinkie cream and mix with red (or other color) food dye. Place in plastic baggie, cut off one corner, and squeeze through hole to draw mouth and scarf.
- Place on decorative plate or in a glass jar, paper doily optional. Lightly spray with water and cover the snowman with sprinkles to look like snow.
Isn’t he cute?! It was tough finding a glass jar or dome to fit our edible winter centerpiece but it all worked out. I could definitely see this as a main decoration n our table when company comes over. Oh, in case your wondering, the bow is super easy to make and it’s attached with a craft pipe cleaner I nabbed from my daughter’s art supplies.
Pin to Win & Comment to Win
What kind of creation will you make with your kids? For inspiration, you can visit the Hostess Pinterest board and peruse all the ideas. While there, pin your favorites and use the hashtag #HostessHolidaySweeps for a chance to win great prizes!
- Grand Prize: One random winner will receive a $1,000 Walmart gift card and Hostess products.
- First Prize: One random winner will receive a $500 Walmart gift card and Hostess products.
- Second Prize: One random winner will receive a $250 Walmart gift card and Hostess product.

But that’s not all. You can also enter to win a $100 Walmart gift card right here.
For more information, recipes, and DIY projects, follow the social channels of Hostess here:
- On Twitter: @Hostess_Snacks
- On Instagram: Hostess_Snacks
- On YouTube: youtube.com/HostessSnacks
- On Pinterest: pinterest.com/hostesscakes
- On Tumblr: hostesssnacks.tumblr.com
- On Facebook:
This blog post is part of a paid SocialMoms and Hostess blogging program. The opinions and ideas expressed here are my own.
23 comments
That is adorable!!
Oh this looks like a super fun craft… that my kids would enjoy doing AND EATING! 🙂
It did turn out cute as can be. I appreciate that it’s under glass… to avoid the temptation of eating it. 😉
Thank you and, yes, that’s very true 🙂 It’s supposed to be edible but how can you chomp that little happy face?!
Thanks for the giveaway! Great idea!
Such a cute and easy project. LOL, My husband would come home and say “cute, can I eat it please?” This would be fun to make with my grand daughter.
Those are adorable and I loveeee hostess. Such a cute and festive idea.
I really like the Snowman behind the glass. What a cute Christmas Craft to make and have on my table as a decoration! Thanks for the fun giveaway!
This is so cute but I would have a hard time not gobbling it up!
Looks quick & easy…good project for kids!
i love this idea. so cute
Such a clever idea. I love seeing new way to decorate with food! Thanks.
It is adorable. But after the rest of the Ding Dongs were gone….. I’d be sneaking in there to eat that hat!
This is too cute! I consider myself a pretty crafty person but how did anyone ever think of this!!
This post really made me want a twinkie…lol
What an awesome idea! I would love making this with my kids!
This is so CUTE 🙂 going to make this my kiddos will love it!
Eek! Those are so cute! I’m hosting a little cookie decorating party for the neighborhood kids, and I would love to make these.
You are so very clever! That seriously looks adorable and I hope you busted it out of the globe and ate it afterwards!
What a creative idea!! I am impressed that you even used Twinkie Cream for the piping.
that is so cute and adorable, it looks like its easy to make too
Making that cute little snowman looks like it was a lot of fun 🙂 good idea.
What a great idea! I enjoyed going through all of the pins on the hostess page. There are quite a few really good ones.
Comments are closed.