


I didn’t get my first manicure until about two years ago and have only gotten a couple since. I have always done my own nails and actually enjoy experimenting with different colors and techniques. However, due to the demands of motherhood, most of my energy is usually spent before I can ever sit down long enough for a coat to dry. It’s sad really. Unpainted fingernails look so unkept and manly to me. Plus, every time I look down at my bare toenails in sandals I have to a cry a little inside.
As I try to balance my time and needs a bit better during the Find Your Healthy campaign with CVS, I’m determined to do a little better in keeping my nails presentable and, hopefully, pretty. Well, toes in general are never pretty to me so I’ll just aim to make them presentable and not “old lady” looking-ish. For my toenails, just a bright coat of polish on my toenails is enough to keep me feeling confident in flip-flops. But, for my fingers, a new design was needed 🙂
Easy DIY Nail Art Ideas
After I scoured the net for some new nail art ideas (just simple ones), I went into see what new colors I could find. Since I was headed to an event that included a visit to Disneyland’s Diamond Celebration, I wanted something sparkly. Essie had some gorgeous metallic type colors so I picked up silver (No Place like Chrome), blue (Aruba Blue), and purple (Sexy Divide).
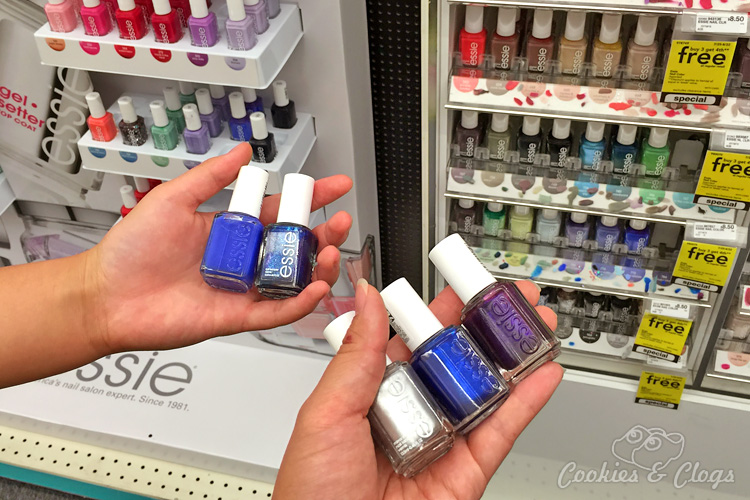
The sale at CVS that week included a BOGO for buying three Essie colors and getting one free. So, I let Munchkin pick any other color she wanted. I’m usually the indecisive one so it was pretty funny to watch her struggle to pick only one.
For my fingernails this time, I worked with the most versatile tool out there – Scotch tape. Using decorative scissors, I was able to cut several zigzag strips. Then, it was just a matter of tape, paint, and peel. Munchkin also used tape (with normal scissors) to paint half of each nail a second color.
7 Steps to Using Tape for Nail Art
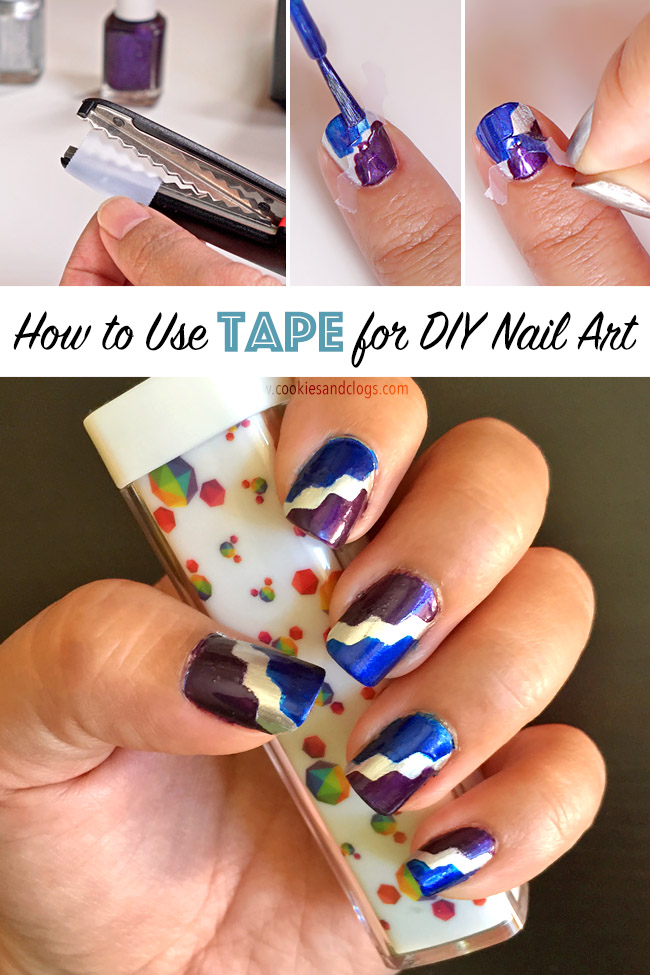
Here are the basic steps to using tape to create DIY nail art designs.
- Apply base coat.
- Apply first color. Allow to dry completely.
- Cut tape into strips and apply to nails in desired design. Use decorative scissors for different patterned lines.
- Apply next color(s). It’s fine if nail polish gets on the tape since it will be removed later anyway.
- Carefully peel away tape.
- Apply top coat.
- Use nail polish remover to take excess paint off skin and nails.
That’s it. There are so many designs you can make with strips of tape. All you need are a pair of scissors, polish, and some patience 🙂 The key is to let each coat dry completely before putting tape on it and to work fast so the polish doesn’t dry, clump, or bubble. Based on the same concept, you can even use adhesive reinforcement labels (to put around paper holes) for circular designs. Easy, right?!
Have you created any nice nail art using tape?
Disclosure: I’m proud to partner with CVS/pharmacy for the #FindYourHealthy campaign. I am being sponsored by CVS/pharmacy for my posts and activities, but all opinions expressed are my own, and all product claims or program details shared should be verified at CVS.com or with the appropriate manufacturers.
2 comments
LOVE IT! I do my nails all the time (often with nail art), and I love how you took something I would normally do on my walls and applied the same concept to your fingernails. Creative, cool, and totally inexpensive!
Thank you 🙂 It was surprisingly easy but definitely takes a bit of practice 🙂
Comments are closed.